Overview
The walkway tool provides an easy-to-use and intuitive method to add moving actors to your scenes. It works by creating paths for characters to follow, using advanced collision and avoidance simulation algorithms to create believable interaction. Walkways offer you exceptional control to achieve the exact distribution of characters you need. Characters can even be adjusted individually to fine-tune your scenes and help you direct the perfect animation.
To see examples of some of the features discussed in this section you will find the following sample scenes accessible from the Welcome Screen.
- Collisions.ani
The crossing walkways in this scene illustrate how Anima handles sophisticated collision avoidance between characters, even when they’re on different walkways. - March.ani
The march formation of the characters in the scene illustrate how the Longitudinal Distribution parameter can be used to position characters along the walkway’s length - Single group.ani
The formation of one coherent group of characters in this scene illustrate how the Actor Clustering property can be used to automatically combine characters into groups. - Aligned People.ani
The aligned characters in this scene illustrate how actors they can be grouped together manually.
Procedures
To create a new walkway
- Click the Walkway Tool found on the left hand side of the 3d viewport.

- Click in the 3d viewport to define the starting point of the path.
- Keep clicking to add additional points. Note that corners are curved automatically and will snap in 45 degree increments (this can be disabled in the Display Properties).
- Right-click to finish drawing.
To extend an existing walkway
To add additional path segments to the start or end of an existing walkway, follow these steps:
- Select an existing walkway by clicking it in the 3d viewport or selecting it from the Project Panel.
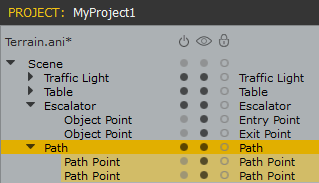
- Click or select the Path Point at the start or end of the path.
- Select the Walkway Tool.
- Click in the 3d viewport to add new Path Points.
- Right-click to finish drawing.
To adjust the width of a walkway
To adjust the width of the entire walkway, either:
- Without anything selected, move the mouse-pointer over the light blue edge of a walkway until the cursor changes to resize mode and the border is highlighted.
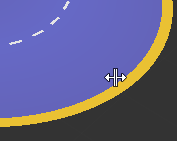
- Click and drag to adjust the width of the walkway.
Or:
- Select the walkway in the 3d viewport or from the Project Panel
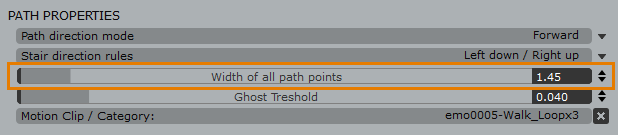
- Go to the Properties Panel and enter a new Width of all path points value.
To adjust the width of individual path points to create a walkway with varying widths, either:
- Select the walkway in the 3d viewport or from the Project Panel.
- With the walkway still selected, move the mouse-pointer over the light blue edge of a path section until the cursor changes to resize mode and the border is highlighted.

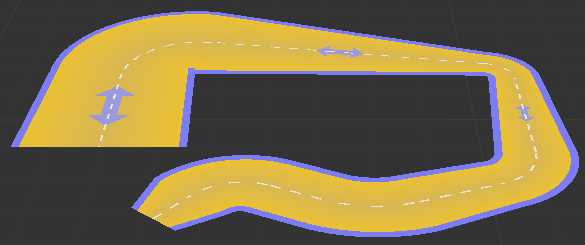
- Click and drag to adjust the width of the walkway at the selected path point. Each segment can be adjusted individually to create paths of nearly any shape.
 Or to edit the width of Path Point from the Properties Panel:
- Select the walkway in the 3d viewport or from the Project Panel.
- Click the path point you wish to resize.
- Go to the Properties Panel and enter a new Width value.

To add actors to a walkway
To add individual actors manually to a walkway:
- Select an Actor from the Library: Actors panel.
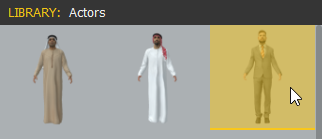
- Click and drag the actor into the 3d viewport and release the mouse. Move the character over the walkway until the mouse pointer change into a link icon and click to place the actor.
To add multiple automatically distributed characters to a walkway:
- Select a walkway in the 3d viewport.
- Go to the Properties Panel.
- Drag actors from the Library Actors panel to the Crowd List in the Properties panel.
 Note. If you leave the Crowd List empty it will automatically use the full library.
 - Use the Actors Count property to enter the number of characters you’d like to create on the selected walkway.
- Click Generate to create the characters.
To control the placement of actors on a walkway
Anima gives you precise control over how your characters are distributed on a walkway either using presets or by creating your own placement patterns using the Cross Distribution, Longtitudinal distribution and Actor spacing range parameters. These are accessed in the Properties panel when a walkway is selected.
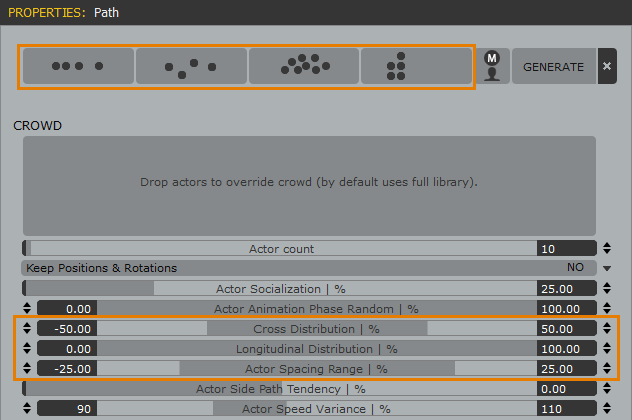
- To use a built-in preset to control the placement of characters, select the walkway and click the buttons at the top of the Properties Panel.

Options include (from left to right): one group in single file formation, multiple small groups, even distribution, one group in squad formation.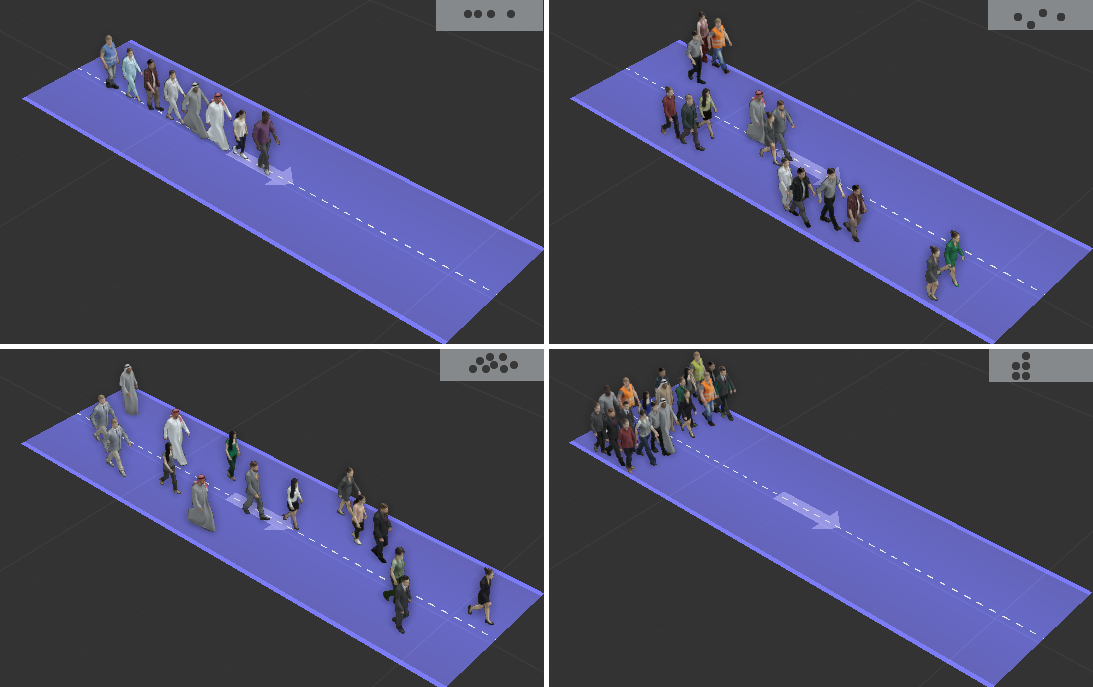
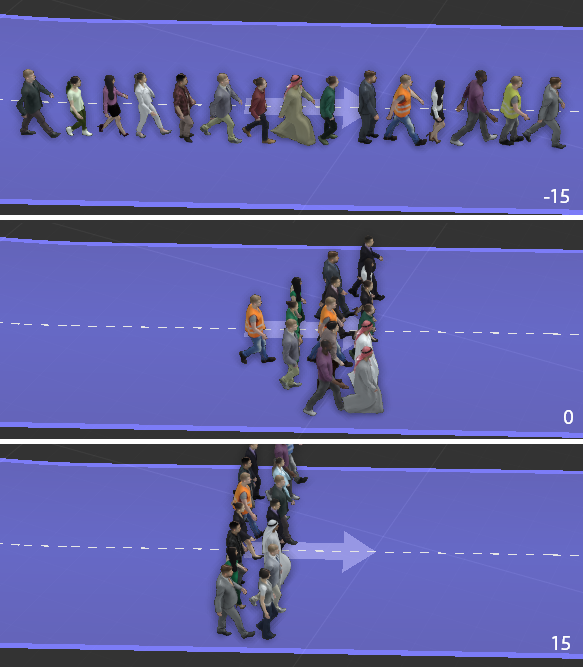
- To control the lateral placement of characters, use the Cross Distribution parameter.
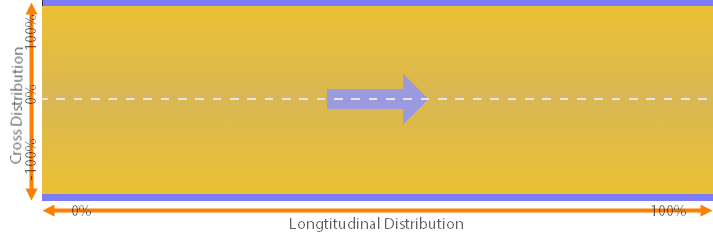
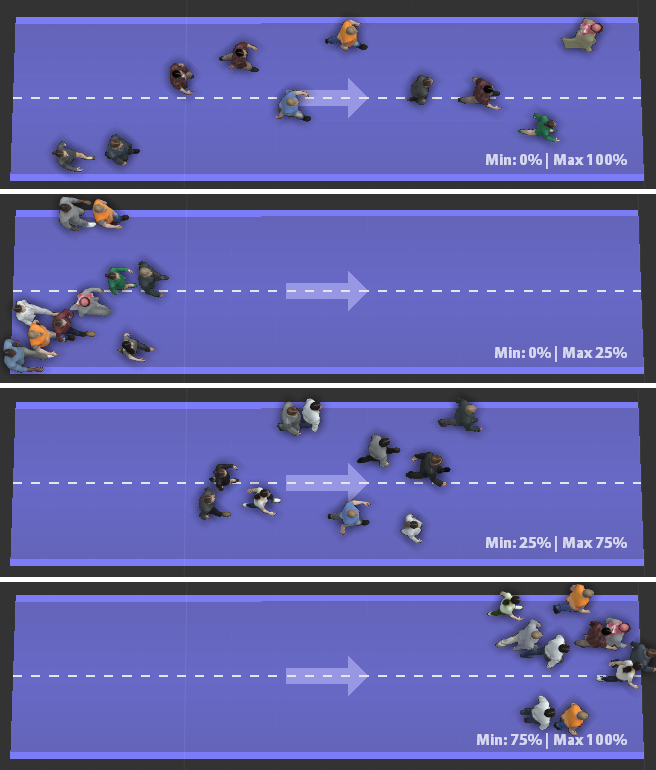
The range starts at 0% in the center and moves outwards to -100% on one side of the walkway and 100% to the opposite side of the walkway - To control the starting point of the characters along the length of the walkway, use the Longitudinal Distribution parameter. The range starts at 0% at the beginning of the path to 100% at the end.

To set the direction of a walkway
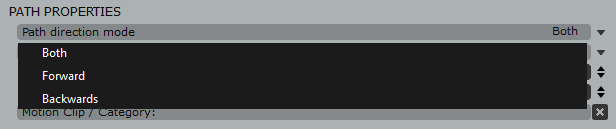
The direction that characters move on walkways is set using one of 3 modes, either forward, backwards or both. To change the mode:
- Select the walkway in the 3d viewport or using the Project Panel
- Go to the Properties Panel and change the mode using the Path Properties > Path Direction Mode dropdown list.
- Click Generate.
To randomize motion clip phase and speed
- Select the walkway in the 3d viewport or from the Project Panel.
- Each character’s motion clip can be randomly offset to create more realistic variation. To set the range for the offset values go to the Properties panel and use the Actor Animation Phase Random Minimum and Maximum properties.

- To randomize the animation speed, set the range using the Actor Speed Variance minimum and Maximum properties.

To assign different motion categories to a walkway
You can assign Motion Clips and Motion Categories to whole paths, or individual path points and segments. To assign a Motion Clip or Motion Category to the entire walkway:
- Select a walkway in the 3d viewport or using the Project Panel.
- Go to the Properties panel.
- Drag a new walking or running Motion Clip or Category to the Motion Clip/Category slot.

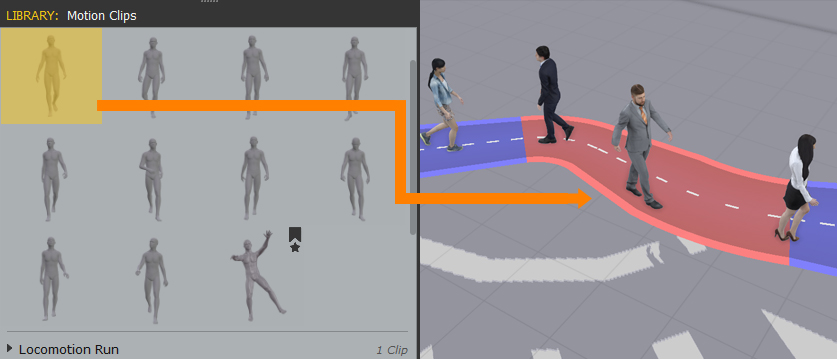
Assigning motion clips of Path Points or segments allows you to change the characters animation based on their position along the path. To assign a Motion Clip or Motion Category to a part of the walkway, either:
- Drag a Motion Clip from the library to a path point or segment. The area will change color to indicate that a custom motion clip has been applied to this area.
Or:
- Select the walkway in the 3d viewport or the Project Panel.
- Select a Path Point.
- Drag a Motion Clip or Category from the Library Panel to the Motion Clip/Category slot in the Properties Panel.

To create clusters of characters
To create a distribution pattern that automatically clusters together characters.

- Select a Walkway from the 3d viewport of Project Panel.
- Go to the Properties Panel.
- Increase the Clustering property. The higher the percentage the larger the groups that are created. At 100% just one large group is created.

- To control the distribution shape of grouped characters use the Distribution Ratio property. Negative values create distributions that stretch longitudinally and positive values create distributions that stretch laterally.
- Finally you can control the spacing between grouped characters using Distribution Radius. Low values will place characters close together and large values will space them far apart. For more naturalistic distribution this is a range slider with a minimum and maximum value. Spacing is calculated by randomly selecting a value from within the range for each character.
It is also possible to manually group characters together to create nearly any possible distribution pattern. To manually align characters:
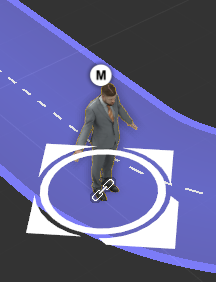
- In the 3d viewport, select the character you wish to move. This character’s position will be linked to another character’s location on the walkway.
- Click and drag the actor over another character to which you wish it to be linked. The cursor will change to indicate that you are creating a group
 .
. - Release the mouse, your character will have moved and it will display an M and character icon to indicate that it is aligned to another actor.
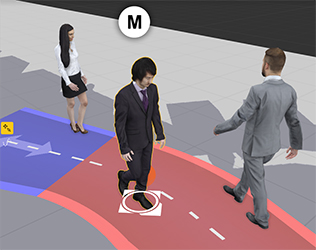
If you locate the character in the the Project Panel you will see that it shows the group as a hierarchy. In fact you can also group characters directly in the project panel by simply dragging them onto one another to create a hierarchy.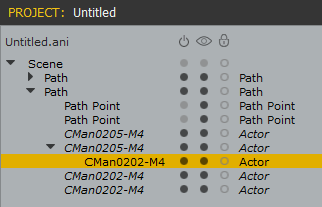
- If you want to change the layout of the group, just move the characters as normal. Moving the person to whom the others are linked will move the whole group, moving the linked characters will allow you to position them individually.
To create a walkway on a background model
- Import a background model – if you need help with this procedure please see Chapter 4 > Scenes.
- Click in the 3d viewport on the background model to define the starting point of the path. The Path Point automatically aligns to the surface of the background model.
- Keep clicking to add additional points.The path will deform to follow the topology of the background model including uneven terrain, slopes and stairs!NOTE You can remove the top and/or bottom of your background model so that you can more easily place paths using the Clipping Range bar on the right of the 3d viewport.

- Right-click to finish drawing.
Interface Reference
Walkway Path Properties
To access a Walkway’s properties, select it in the 3d viewport and open the Properties panel.
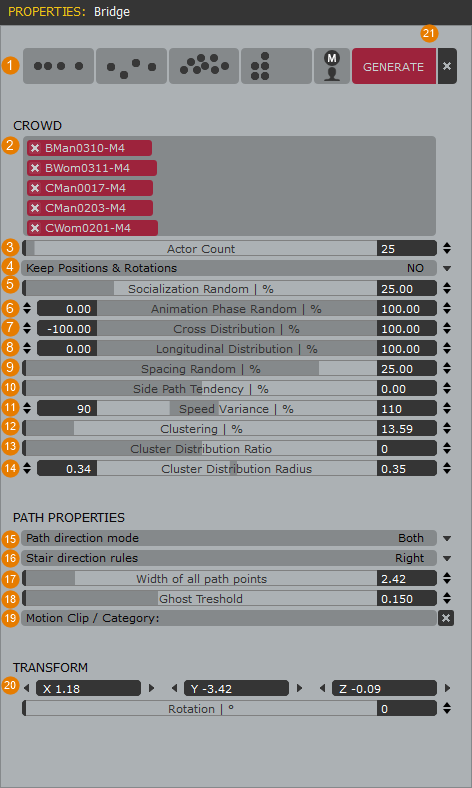
- Crowd Presets
Click the buttons to use the built in crowd placement presets. Options include (from left to right): one group in single file formation, multiple small groups, evenly distributed actors, and one group in marching formation. - Crowd List
Contains a list of all the actors to be distributed on the walkway. Drag selected characters to the list from the Actors panel or leave it blank to use the full library. - Actor Count
The number of actors to create on the walkway. - Keep positions and Rotations
When this is set to No, clicking Generate will create a completely new distribution. When set to Yes the Position and Rotation of current actors will be retained but motions, colour variations and phase control will be randomized.

- Socialization Random
Used when square areas and walkways intersect. This value determines the likelihood that an actor will leave the walkway and socialise with other characters on the square area. At 100% nearly all the characters move the square area, at 0% none of them do. - Animation Phase Random
Defines the range of motion clip phase offset that will be randomly applied to each actor. - Cross Distribution
Defines the position range in which characters can be placed on the lateral axis of the walkway. - Longitudinal Distribution
Defines the position range in which characters can be placed on the longitudinal axis of the walkway. - Spacing Random
Determines the distance that characters socialising on square areas will stand to one another. Larger values create a sparse distribution, low values create a dense distribution. - Side Path Tendency
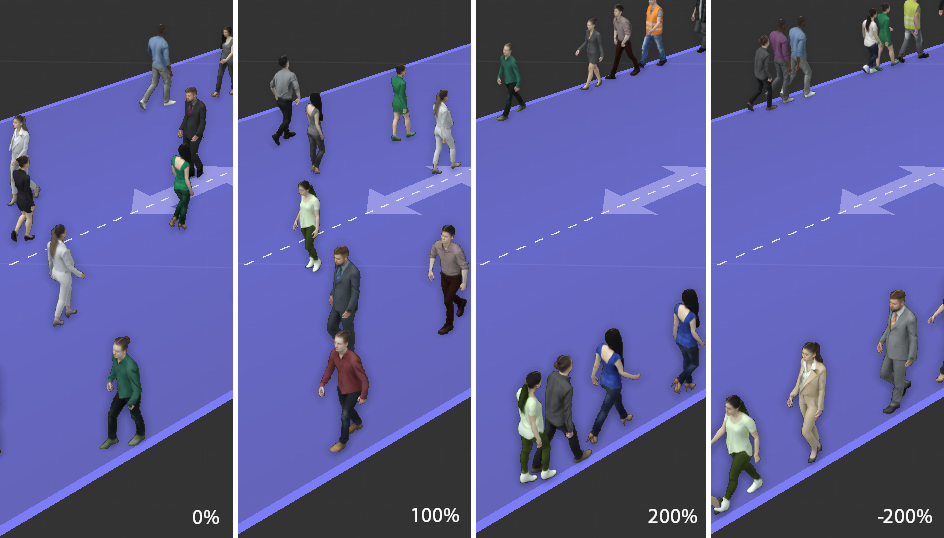
When the walkway Path Direction Mode is set to Both, this parameter controls how much walk on the sides. At 0% characters characters walking in both directions use the full width of the walkway. At 100% forward and backward walking characters use half the walkway each. At 200% characters walk only along opposing outer edges of the walkway. Using negative values reverses the sides.
- Speed Variance
Defines the range of random speed variation applied to characters. - Clustering
Defines the tendency for characters to form into groups, low values create many small groups and large values create few large groups. - Distribution Ratio
Controls the distribution shape of characters grouped together using the clustering feature. Negative values create distributions that stretch longitudinally, positive values create distributions that stretch laterally. - Actor Distribution Radius
When using the clustering feature this range controls the randomized distance between characters in groups. Large values create groups that are dispersed and small values create groups that are tight-knit. - Path Direction Mode
Defines the direction the characters travel on the walkway, options include Forward, Backward or Both. The direction is represented by a blue preview arrow on the walkway so that you can easily see which way characters will travel.

- Stair Direction Rules
Controls the side-path rules for characters climbing stairs. Options are left down/right up, light down/left up, or no stair rules. - Width of all Path Points
Defines the width of all path points in the selected Walkway. - Ghost Threshold
Defines a collision distance. If two characters are closer than this distance one of them is removed from the simulation. - Motion Clip/Category
Used to assign a Motion Clip or Motion Category to the entire walkway. To assigned motion clips to parts of the walkway use the Path Point parameters (see below). - Transform
Position, and rotation in world space of the Walkway. - Generate/Delete Simulation.
Click Generate or update actors using the current distribution settings. If characters have already been generated , clicking this button again will create a new random distribution. To delete all the generated actors click the X button.
Walkway Path Point Properties
To access a Path Point’s properties, first select a walkway in the 3d viewport and then click a path point and open the Properties panel.
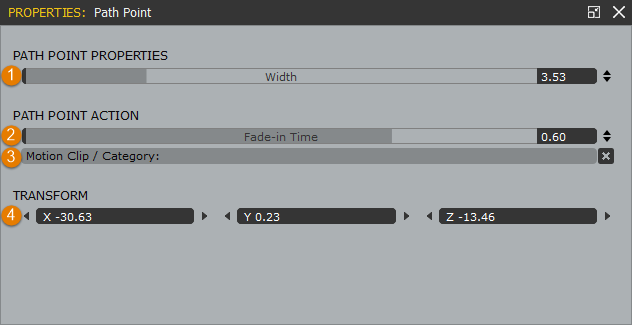
- Width
The width of the walkway at the selected Path Point - Fade-in Time
The time (in seconds) of the fade between the previous motion clip and the new one assigned in the Motion Clip/Category slot. Small values will result in an abrupt transition. Larger values will generate a smoother transition. - Motion Clip/Category
Assigns a Motion Clip or Category to the Path Point. Characters that walk through this path will use this Motion Clip until they walk through another section or point with a different Motion Clip. This makes it possible to change the animation for characters as they walk along the path for example changing from a walk to a run. - Transform
The position in world space of the Path Point.