If you work in a large company that has several render nodes, installing Anima machine-by-machine isn’t really an option. Ideally this task should be automatic so we’ve developed a command line deployment tool that allows you to install Anima, the plugins for Cinema 4D and 3DS Max, and makes licensing a whole lot easier.NOTE: Ensure 3ds Max and/or Cinema 4d is closed before running the installer so that the necessary plugins can be installed automatically.
Installing Anima render nodes using the Command Line Deploy tool
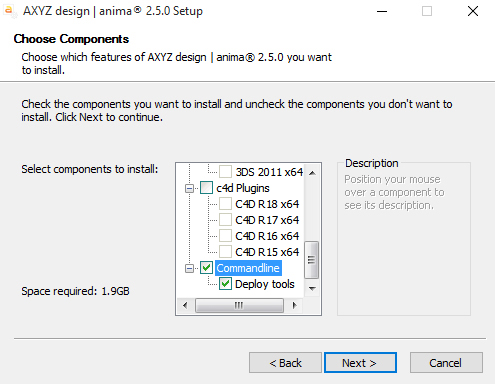
To get and install the Command Line Deploy tool please select the component in the main anima installer as shown in the image below.
After the installation the tool can be located inside anima installation folder, usually C:\Program Files\aXYZ design\anima 2. Running the program will generate a log file (log.txt) that explains the available parameters and summaries what they do.

Available parameters:
- Running
Shows the path from which the deploy tool was executed. It isn’t used directly for the installation process, but is provided for your information and for bug checking. - -path “C:\****”
Defines the path where the deploy tool should install Anima. - -3dsmax2013 “C:\****”, -3dsmax2014 “C:\****”, -3dsmax2015 “C:\****”, -3dsmax2016 “C:\****”, -3dsmax2017 “C:\****”
Defines the root directory of the 3ds Max installations on the target machine. They will be used to install the plugins needed to open projects in 3ds Max that contain Anima assets. As you can see the same formatting is used for all supported versions, simply append the 3ds max version after -3dsmax. - –c4dr15 “C:\****”, –c4dr16 “C:\****”, –c4dr17 “C:\****”
Defines the root directory of the Cinema 4D installations on the target machine. They will be used to install the plugins needed to open projects in Cinema 4D that contain Anima assets. As you can see the same formatting is used for all supported versions, simply append the Cinema 4D version after -c4d. - -generatelic
Used to generate a Hardware ID file that is required for licensing purposes. These are needed for the Render Node License Manager to generate valid licenses based on the hardware profile of the PC. - -readlic
Used to read licenses generated by the Render Node License Manager and authorise the Anima installations.
For example, to run the command line on a render node that has programs saved on the C drive including 3ds Max 2013, 2017 and Cinema 4D R15 in a folder called apps you would use the following parameters
Licensing render Nodes
Licensing render nodes using the command line tool is a 3 step process:
- Generate a Hardware ID for each node on your farm using the Command Line Deploy tool. Hardware IDs are saved in a file with a .hid file extension
- Use the hardware ID (.hid) to generate a valid License using the Render Node License Manager tool. Licenses are saved in a file with a .acc extension.
- Authorise the installation on each node using the generated license (.acc) using the Command Line Deploy tool.
Step 1 – Generating hardware IDs
Use:
commandlinedeploy.exe -generatelic
To generate a hardware just run the commandlinedeploy.exe tool using the -generatelic parameter. This will create a .hid file. In the filename the word that follows the @ symbol is the Windows name of the computer for the hardware ID.
Run this on every machine for which you need a license and copy the .hid files to the same director as the Anima Render Node License Manager tool and then move on to the next step.
Step 2 – Generating licenses
Open the Anima Render Node License Manager tool and it will automatically detected the .hid files created in the previous step. .hid files that are not currently licensed are highlighted in red whereas those shown in black are already licensed and have an associated .acc file.

To license these machines you will need to paste your Order Purchase Code plus the Email used to place the order and then click Read Licenses. You will then see the licenses that you have used and those that are available.
Click use licenses and wait a little while while the tool reads the license data. You’ll see that as the licenses are applied to the .hid files they turn black and the available licenses on the left turn red to indicate that they are now in use. Once this process is complete you’ll have matching pairs of .hid and .acc files, one set for each computer. The .acc files are used in the next step to authorise the machines.
Step 3 – Installing licenses
Use:
commandlinedeploy.exe -readlic
To install licenses run the commandlinedeploy.exe tool using the parameter -readlic on each machine, you’ll now have valid licenses installed. You can use this kind of command line in a bat file to allow you to deploy the software across a large farm.
We hope this tools saves you time and makes installing on multiple machines easier but if you have any questions please don’t hesitate to contact our support team.