Anima has an easy-to-learn and unobtrusive interface that’s designed to guide you through the process of creating complex animations in record time. To do this it separates the creation process into two modes. Drawing Mode provides sophisticated tools to place characters in the scene including creating paths or areas, placing seated characters, animating elevators, and adding logic using traffic lights. Editing Mode allows you to fine tune Actor’s poses, import new characters and motion clips, organise content, create colour variations and much more. Each mode has a set of dedicated panels that allow you to focus on the task at hand.Before working with Anima for the first time we recommend taking a few minutes to get acclimatized with the user interface.
The Welcome Screen
When you open Anima you will be presented with the welcome screen which gives you instant access to your recent projects and scenes. In addition it allows you to create new projects, manage existing ones, and provides easy access to demo files, tutorials and our support channels to help you get the most from our software.
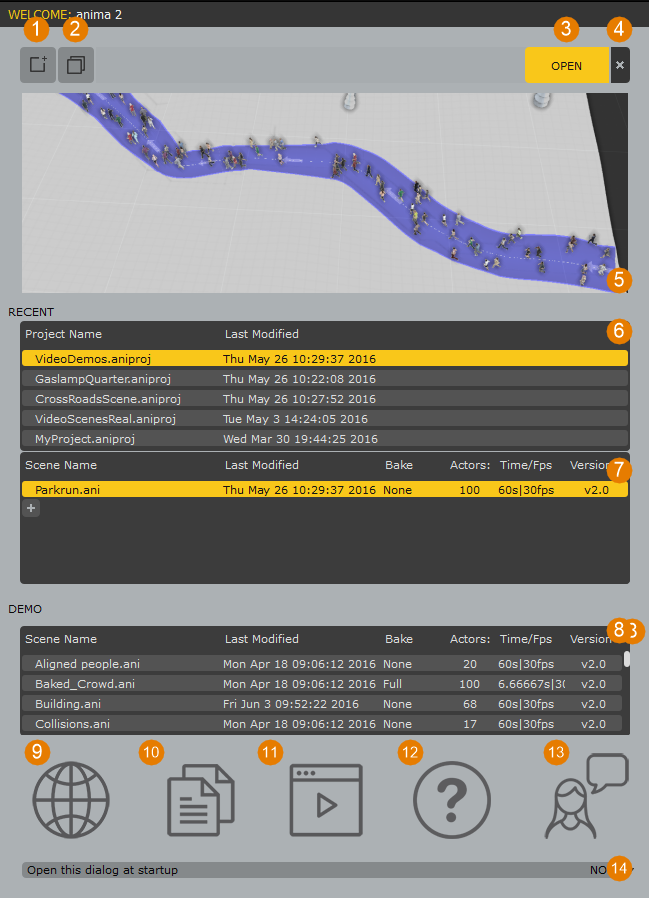
- Create New Project
Create a new project. Click to display the New Project window.
- Clone Scene
Duplicates the scene selected in the Project Scenes list.
- Open Selected Scene
Opens the scene selected in the Project Scenes list.
- Close Welcome Screen
Click to close the welcome screen.
- Preview
Shows a preview of the scene selected in the Project Scenes list. These are generated by Anima automatically - Recent Projects
Lists the 5 most recently used projects.
- Project Scenes
Lists the scenes in the project selected in the Recent Projects list. To open a scene select it here and click the Open Selected Scene button (3).
- Demo Scenes
Select and open these scenes to see sample files with demonstrations of Anima’s key features - View Website
Click here to open the AXYZ Design web site. - Open Documentation
Click here to go to the Anima online documentation. - View Video Tutorials
Click here to access Anima tutorials. - FAQ
Click here to see frequently asked questions about Anima. - Contact Support.
If you have a question that’s not answered in our documentation, on our forums or in the tutorials, click this button to contact support. - Open at Startup.
Choose if the welcome screen should display when Anima starts.
The Drawing Mode Interface
You design, organize and render your animations in Anima’s Drawing mode. The drawing view is arranged into logical panels to help you focus on different aspects of your work such as assigning Actors, applying motion clips, creating areas and paths, editing properties and managing your project.
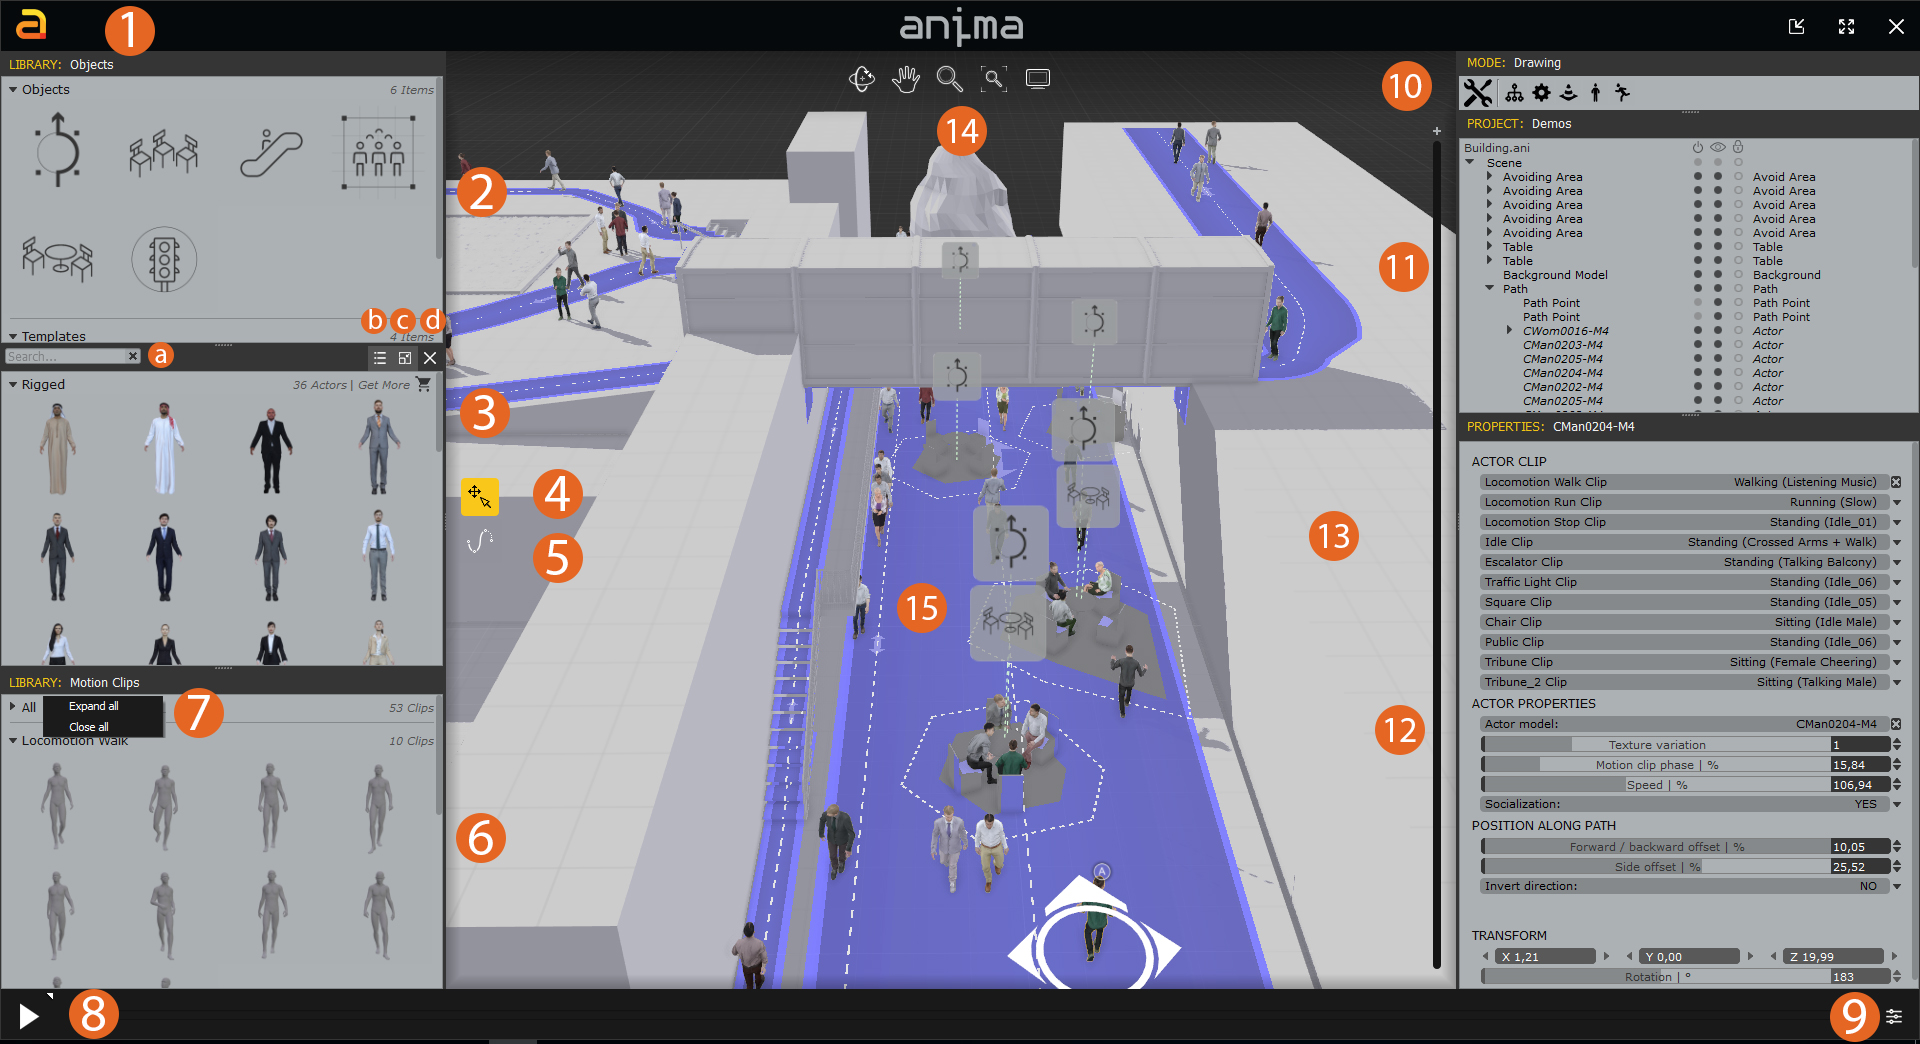
- Main Menu
In the main menu you will find the Project, Scenes, Edit, Preferences, Workspaces, Help and Exit tabs. - Objects Library
The Objects library contains system-wide and user-defined area presets. Drag these into the 3d Viewport to quickly populate scenes.
a. Filter bar
b. Thumbnail & list view
c. Floating panel
d. Hide panel - Actors Library
Contains a list of all the Actors available in the current project. Drag them onto characters into the 3d Viewport, or into the Crowd field of the Properties panel to assign characters to areas. - Select and transform tool
This will allow you to select objects and actors from the viewport. - Walkway tool
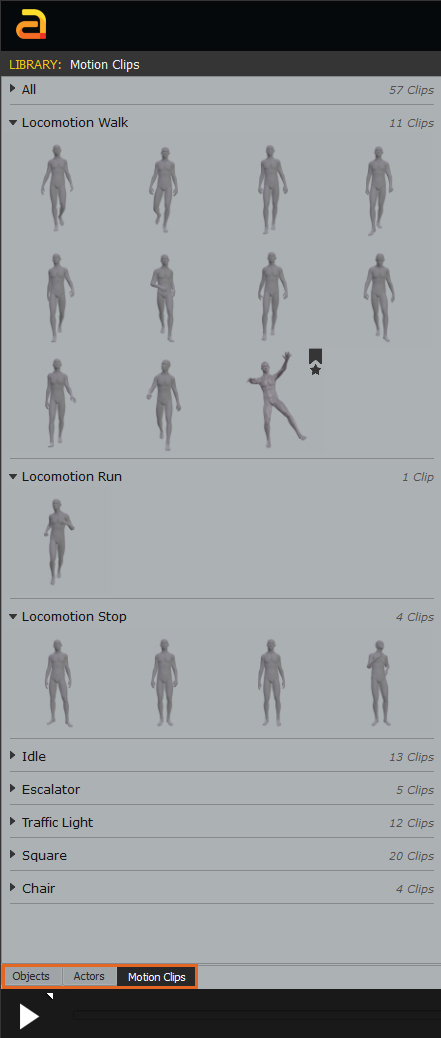
Lets you draw walkways or paths along different terrains. - Motion Clips Library
Contains a list of all the motion clips and categories available in the current project. Drag these onto the Motion Clip/Category property of an area to assign to all its characters. Assign it to individual characters by dragging to their Actor Clip properties, or assign to a specific path section in the 3d Viewport. - Collapsible & expandible tabs
The new tab system allows you to organize and find assets quickly and easily.
Right click to collapse or expand all the tabs at once. - Play back controls
Use these controls to play back animations, set the animation range and frames per second.
a. Compute and play
b. Preview mode
c. Generate video - Playback settings
Adjust the frames, time, playback speed, fps, format and quality of the video. - Mode
The mode window is used to toggle the workspace between Drawing and Editing modes and allows you to show and hide panels. - Project
This window shows a hierarchical view of all the areas and actors in your scene and allows for an at-a-glance understanding of the project. From here you can create, select and edit all the elements in the animation. - Properties
Shows the properties for the currently selected object. This panel is dynamic and it’s contents will be different depending on the type of object selected. - Clipping Tool
Drag up and down to reveal different levels of height of the background model. Or click the ¨+¨ icon to create points. - Navigation Panel
In here yo can chose to Orbit, Pan, Zoom, Frame or Navigation presets. - 3D Viewport
Shows a real-time preview of your animation project and enables you to design, create, and edit areas as well as move actors, assign motion clips, import background models, and create your scenes.
The Editing Mode Interface
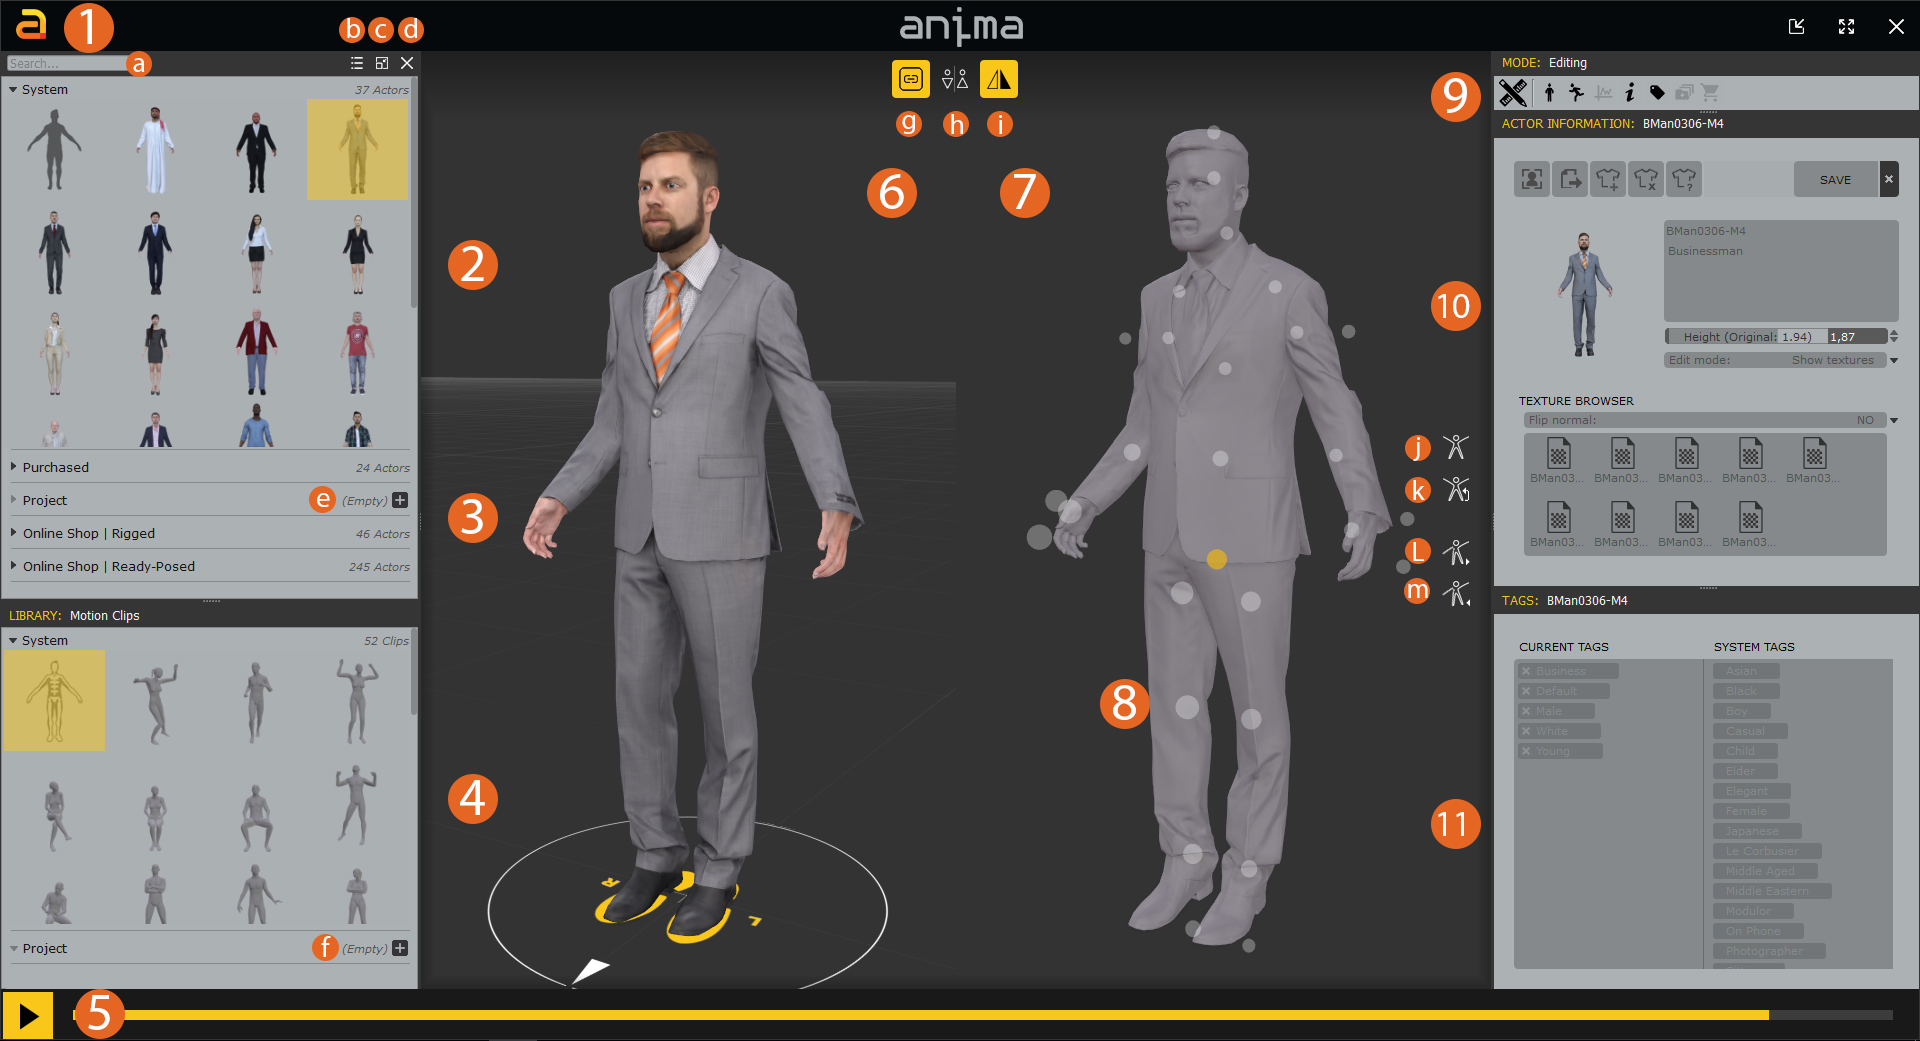
- Main Menu
In the main menu you will find the Project, Scenes, Edit, Preferences, Workspaces, Help and Exit tabs. - Actors Library
Contains a list of all the Actors available in the system, current project, purchased, and available Actors on the online store.
a. Filter bar
b. Thumbnail & list view
c. Floating panel
d. Hide panel - Collapsible & expandible tabs
The new tab system allows you to organize and find assets quickly and easily.
Right click to collapse or expand all the tabs at once.
e. Mesh & rig importer - Motion Clips Library
Contains a list of all the motion clips and categories available in the current project and allows you to import additional motion clips.
f. Motion clip importer - Play back
Plays the motion clip and the character selected - Preview window
Displays a preview of the character selected in the Actors Library with the animation selected in the Motion Clips Library. Any edits to the pose or textures are updated live in this window. - Pose Editor Window
Use the pose editor to adjust the Actor’s pose for the currently selected motion clip. This can be used to correct individual actors for each individual motion clip or even apply changes that are applied globally.
g. Synchronize viewports.
h. Generic male or female
i. Symmetrical pose editing - Joints
Click hold and drag them to change the angle or the position to adjust the pose. - Mode
The mode window is used to toggle the workspace between Drawing and Editing modes and allows you to show and hide panels. - Actor / Clip Information
Displays settings and components for the currently selected Actor or motion clip.
j. Pose Reset
k. Undo last saved pose
L. Copy pose
m. Paste pose - Tags / Categories
Tags and categories help you to organize your resources and allow the system to match the correct motion clip to the characters.
Customizing the Workspace
Anima is designed to be flexible and fit into your way of working. The interface can be freely adapted to the way you work by enabling and disabling panels and changing the layout and size.
To turn panels on or off
- Click the panel’s Icon from the Mode panel to toggle them on and off. Light grey icons are hidden, those shown in black are visible.

- Panels can also be closed by clicking on the X button found in the right hand corner.

To rearrange, resize and tear-off panels
- To resize a panel drag the top or bottom. To resize the column, drag the sides.
- To move a panel, click and drag on the title bar. Valid areas that the panel can be moved to will be highlighted in yellow as you mouse over them. Drag inbetween panels to change the position, or drag on top of another panel to create a tabbed group.
- Drag a panel to an empty part of the screen or click the detach button in the top right hand corner to tear-off a panel. This is ideal for users with multiple monitors as it lets you place the panels on one monitor and keep the 3d viewport on another.

To create tabbed panels
- To combine a panel with another to form a tabbed dock, drag it by it’s title bar on to the target panel.
To toggle between thumbnail and list views
- Click the
 icon for lists and the
  icon for thumbnails.
To reset the workspace
- To reset the layout to the system default go to the Main Menu and select Workspaces > Default Layout.
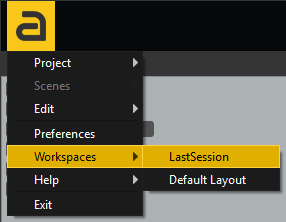
- To restore the layout to the previous settings, go to the Main Menu and select Workspaces > LastSession.