2The Time Bar
The time bar is found at the bottom of the interface. Here you’ll find all the controls you need to play your animation, set the scenes’s duration, framerate, and playback speed. This interface can also be used to create and export preview renders.

- Play
Click on the play button to preview the animation. - Playback Range Start
Click and drag this marker to set the starting point of the playback range. When previewing the animations will loop within the range set using these markers. - Current Frame Marker
Shows the current frame number and position. Click and drag this marker to scrub playback. - Playback Range End
Click and drag this marker to set the starting point of the playback range. - Time Setup options
Click this button to open the Time Setup options. Use these to set framerate, duration, playback speed and preview render size.
Playback Modes
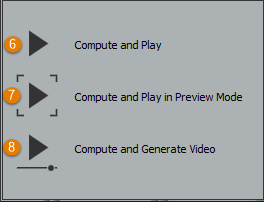
- Compute and Play
Use this mode to playback the animation in the 3d viewport. In this mode walkways, areas and other helper objects are visible. - Compute and Play in Preview Mode
Use this mode to playback the animation in the 3d viewport. In this mode walkways, areas and other helper objects are hidden. - Compute and Generate Video
Use this mode to generate a video file of your animation in AVI format. The resolution of the video file can be set from the Time Setup options (see below). Once a file has been created you’ll be asked if you want to open the previews directory where the file is saved. In this mode walkways, areas and other helper objects are hidden.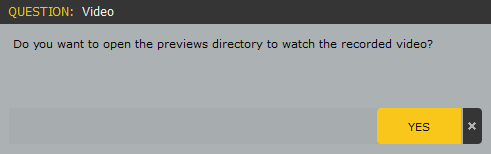
Time Setup
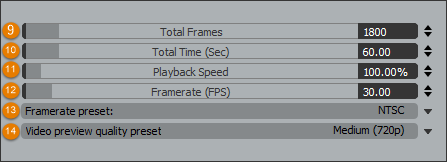
- Total Frames
Use this parameter to set the animation’s duration in frames. When you adjust this property the Total Time value will also update based on the current framerate. - Total Time
Use this parameter to set the animation’s duration in seconds. When you adjust this property the Total Frames value will also update based on the current framerate. - Playback Speed
Use values larger than 100% to speed up the animation and values less than 100% to slow it down. - Framerate
Set a custom framerate. - Framerate Preset
Choose a framerate from a list of common standardised presets. - Video Quality Preset
Choose the resolution of the preview file produced when using Compute and Generate Video mode. Options are low (360p), medium (720p) and high (1080p).