To perfect your animation, Anima allows you to easily change every aspect of individual characters once they’re been created. You can even move characters between areas, just drag an actor from one area to another and their behavior will update automatically.
Procedures
To change an existing character’s model
Either
- Drag a new actor from the Library panel onto a character in the 3d viewport.
Or:
- Select the character in the 3d viewport or the Project Panel.
- Drag a new actor from the Library Panel to the Actor Properties > Actor Model slot in the Properties Panel.
To change a character’s texture variation
- Select a character in the 3d viewport.
- Choose a new texture using the Actor Properties > Texture Variation value in the Properties Panel.
To adjust the position and direction of an individual character using the selection tool
- Click the Selection Tool.

- Select a Character in the 3d viewport.
- Use the transform gizmo to move and rotate the character. Click and drag on the arrows to move the character using axis constraints, click and drag on the circle to rotate the character, click inside the circle to freely move the character on any axis.
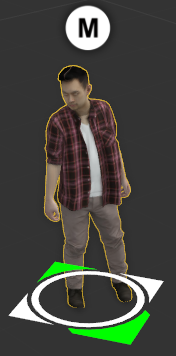
NOTE When you move a character using the Selection Tool it displays an M to indicate it has been manually placed. This means that this character is no longer controlled by the settings in the walkway or area properties.
To adjust the position and direction of an individual character using parameters
- Select the character to edit.
- Go to the Properties Panel.
- Use the Position Along Path > Forward / Backward Offset value to adjust the characters longitudinal position on the walkway.
- Use the Position Along Path > Side Offset value to adjust the characters lateral position on the walkway.
- Use Invert Direction (yes or no) to swap the character’s direction on the walkway.
To change the motion clip for an individual character
- Click on a Character in the 3d viewport.
- Go to the Properties Panel. Each character has a Actor Clip slot that determines the Motion that is used for each type of .
- To change the animation, drag an asset from the Library: Motion Clips Panel to the Actor Clip slot.
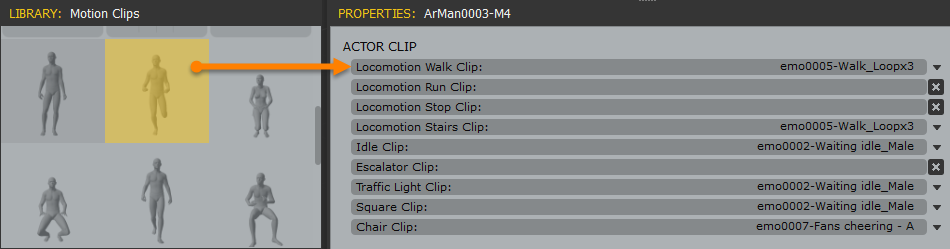
Alternatively you can select a valid Motion Clip using the drop down list accessed by clicking on the Expand ( ) arrow to the right of the Clip Slot.
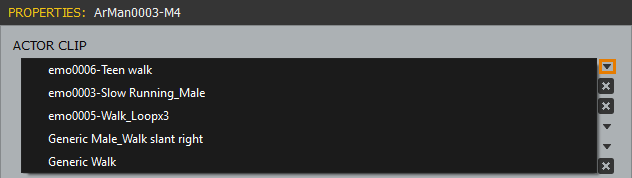
Interface
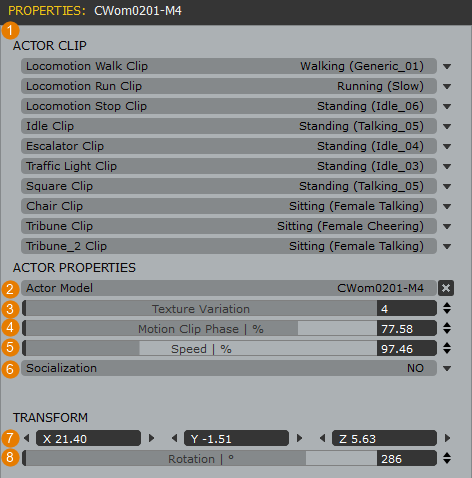
- Motion Clip
Shows the motion clip that this character will use for each type of area object. These can be changed using the drop down list or by dragging a new Motion from the Library to the relevant slot. - Actor Model
Shows the model used for the character. To change the mode drag a new one from the Library to this slot or directly onto the character in the 3d viewport. - Texture Variation
Sets the current texture variation. Use the slider to select from the available versions. - Motion Clip Phase
Sets the phase offset for the motion clip. - Speed
Sets the speed of the character’s walkway animation. Increasing this speed you can make your characters run instead of walk. - Socialization
Determines if a character can leave the walkway to socialise on an area. - Transform
Position and Rotation in world space of the character.